GIGA 3+ - Appareil photo numérique JOBO - Notice d'utilisation et mode d'emploi gratuit
Retrouvez gratuitement la notice de l'appareil GIGA 3+ JOBO au format PDF.

| Type de produit | Disque dur portable avec lecteur de cartes, lecteur MP3, radio FM et enregistreur |
| Marque | JOBO |
| Modèle | GIGA 3+ |
| Capacité du disque dur | 40 Go |
| Types de cartes supportées | CF I/II, Micro Drive, SM, SD, MMC, MS, MS-Pro, MS-Duo-Pro (XD avec adaptateur) |
| Alimentation | Batterie lithium-ion rechargeable (2-3 heures de charge) ou adaptateur secteur AC (100-240V) |
| Autonomie de la batterie | Environ 8 Go de transfert de données ou 8 heures d'écoute MP3 |
| Connectivité | USB 2.0 (direct, sans hub) |
| Systèmes d'exploitation supportés | Windows 98SE/2000/ME/XP, Mac OS 9.0-9.6 et OS X 10.1+ |
| Formats de fichiers | Tous types de données, y compris RAW |
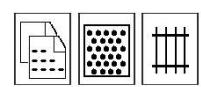
| Fonctions principales | Copie de cartes mémoire, gestion de fichiers, lecteur MP3, radio FM, enregistrement vocal |
| Dimensions | Environ 120 x 80 x 25 mm |
| Poids | Environ 250 g |
| Entretien et nettoyage | Essuyer avec un chiffon doux et sec. Ne pas utiliser de produits chimiques. |
| Sécurité | Ne pas utiliser d'adaptateur autre que celui fourni. Éviter les chocs et l'humidité. |
| Pièces détachées et réparabilité | Batterie, adaptateur secteur, câble USB, écouteurs disponibles. Réparation par service agréé. |
| Informations générales | Notice d'utilisation disponible en PDF sur notice-facile.com. Support technique : support@jobo.com. |
FOIRE AUX QUESTIONS - GIGA 3+ JOBO
Questions des utilisateurs sur GIGA 3+ JOBO
0 question sur cet appareil. Repondez a celles que vous connaissez ou posez la votre.
Poser une nouvelle question sur cet appareil
Téléchargez la notice de votre Appareil photo numérique au format PDF gratuitement ! Retrouvez votre notice GIGA 3+ - JOBO et reprennez votre appareil électronique en main. Sur cette page sont publiés tous les documents nécessaires à l'utilisation de votre appareil GIGA 3+ de la marque JOBO.
MODE D'EMPLOI GIGA 3+ JOBO
Instruction manual Giga 3+
Mobile photo hard drive incl. 40GB hard disc. For digital photographer GIGA 3+ is one of the most innovative and economical solution for solving the problem of having not enough storage space. Please read instructions carefully before first use of your GIGA 3+ .
Contents
Page
- Content / Included accessories 2
- Instructions 2
- Functions 2
- Symbols of the main menu 2
- System Support 3
- Supported Flash Memory and how to use it 3
7.How to use the different card slots 3 - Inserting and charging the battery 4
8.1 Inserting battery
8.2 Charging battery
9.Use of AC power adapter 4
10. Switching on the GIGA 3+ 4
11. Quick Guide 5
12. Connecting the GIGA 3+ to a PC 6
12.1 WIN XP
12.2 Managing the GIGA 3+ from a PC
12.3 WIN 98SE, ME, 2000
13.MAC OS 6
13.1 MAC 10.1 or higher
13.2 MAC 9.0-9.6
- Download data from flash memory (without PC) 7
14.1 Verify - secured data transfer
14.2 Failed data transfer
14.3 Interrupt data transfer
14.4 File management
15 hard disc drive full/reformat 8
15.1 No capacity
15.2 Reformatting of the GIGA 3+
- data management 9
16.1 Choose data source
16.2 File management
-
MP3 Function 12
17.1 Settings in the menu -
FM Radio 13
- Record function 14
- Optional battery power 15
20.1 Using external battery
20.2 Using car adapter
- Compatibility 16
- Remarks 16
23.Troubleshooting 16
1. Content
Giga 3+ with 40GB HDD
- AC power adapter
Lithium Ion battery
- USB cable
- Driver CD
- Instruction Manual
- Headphones
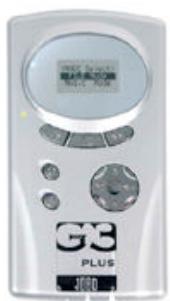
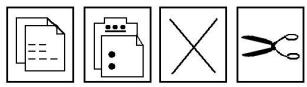
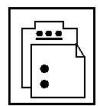
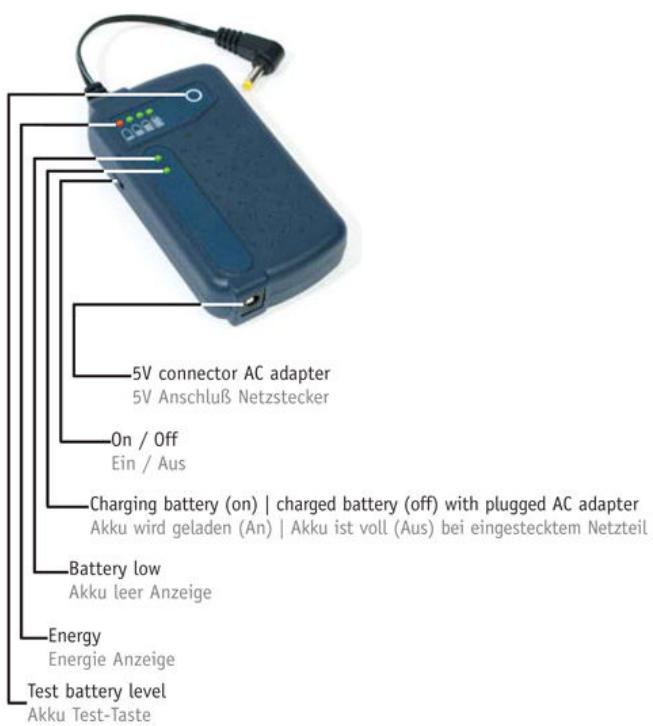
2. Exterior Structure
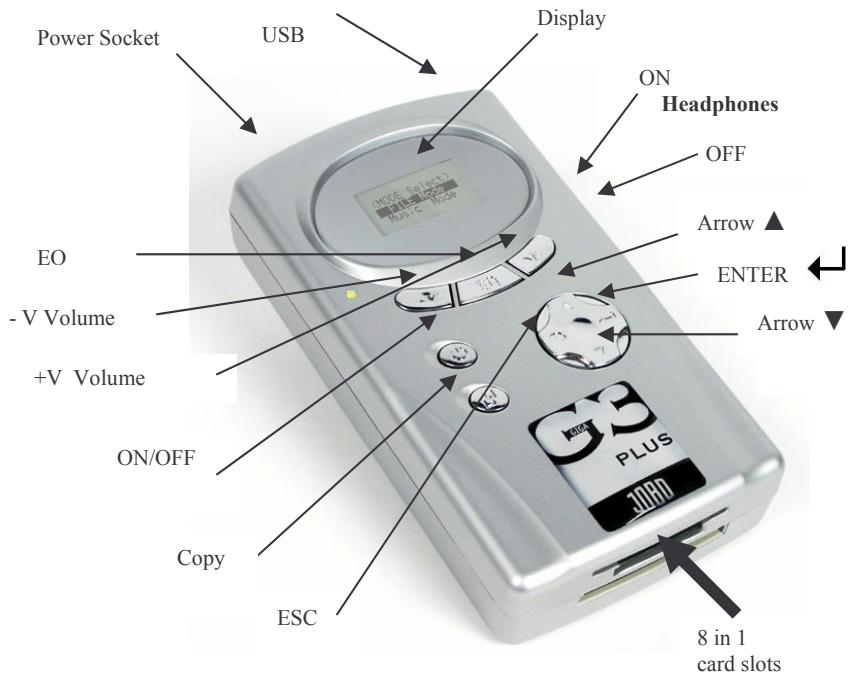
Battery-Chamber
3. Key Functions
ON/OFF - switches device on/off
COPY - fast copy/function
-ENTER
ESC - back to main menu
-
choose menu up/down
-
V -Volume control down
+V -Volume control up
EQ -Menu for MP3 and record function
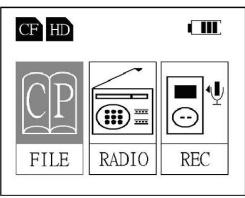
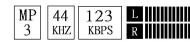
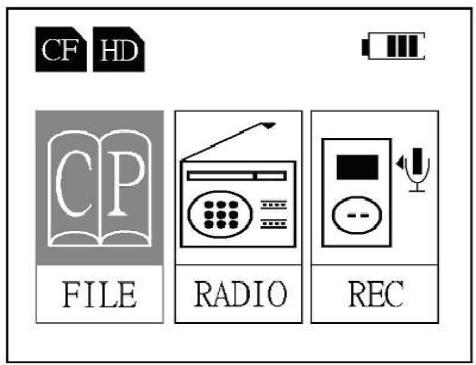
4. Displaying symbols of the main menu

FILE -File Management
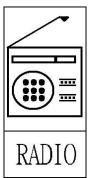
RADIO -FM Radio
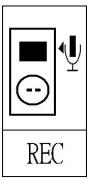
REC - Record Function


Socket
Symbol HDD
- shows activated hard disk
Symbol CF-card
- shows inserted flash memory (CF,SD,MS,SM)
Symbol charging battery
- shows working AC power adapter
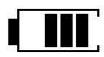
Symbol Battery
shows battery status maximum 4 bars

Symbol FILE - Enter the data management menu (files and MP3)
Symbol Radio- Enter the radio function
Symbol REC - Enter the recording function
5. System Support
WIN 98SE / 2000-SP3/ ME / XP-SP1 /for MAC 9.0 - 9.6, or higher
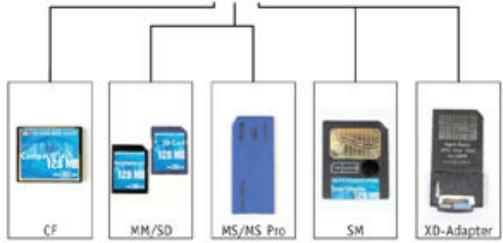
6. Supported flash cards
CF I, II, Micro Drive, SM, SD, MMC, MS ,MS-Pro, MS-Duo-Pro (XD with adapter)
7. How to use the different flash cards
Note
JOBO grants no warranty for wrong insertion of flash cards and duely damaged slots.
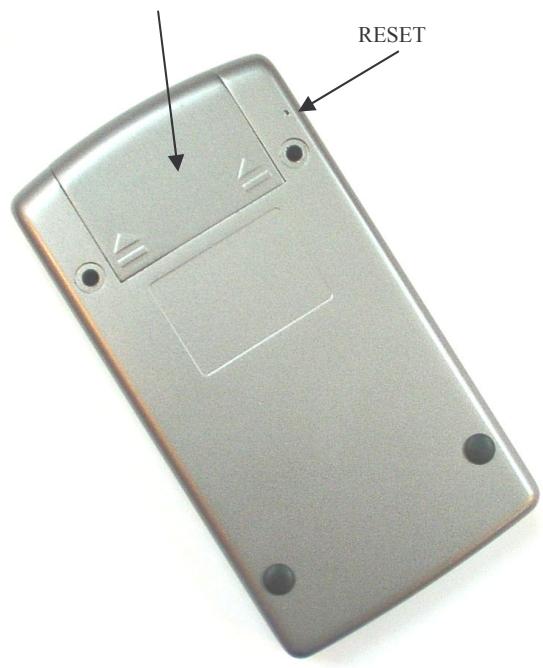
8. Inserting the battery
8.1 Insert battery
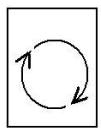
- Open the battery chamber while pushing the cover in direction of the arrows
- insert socket in the right position.
- put in battery and close the battery chamber.
8.2 Charge battery
battery needs 2-3 hours to be fully charged.
- before first use, battery should be charged for 3 hours.
- for charging GIGA 3+ put in AC power adapter in the power socket and connect with power.
You can use the AC adapter for 100 to 240V
- while charging battery the red LED is on, left of the display.
battery charging is finished, when LED is changing from red to green. - when power adapter is connected, next to the battery symbol a power plug is being displayed.
- with full charge of battery you can:
download about 8 GB data.
listen to about 8 hours of MP3.
9. Connecting AC power adapter
Giga 3+ can be connected with supplied AC power adapter for usage or for charging the battery. The power socket is based on the upper side of the device.
Warning!
Never use another power adapter for GIGA 3+ even when it seems to work with it. Using wrong power adapters can severely damage the Giga 3+!
10. Switch on/off Giga 3+
- press ON/OFF button - display turns to cool blue and shows "Jobo - For your best Image" claim for 2 seconds.
After that the main menu is being displayed - "FILE, RADIO, REC".
- to switch off, press ON/OFF button.
- For saving energy the colour backlight of the display is switched off after 10 seconds, and the whole device is switched off after 30 seconds when not in use.
Quick guide for GIGA 3 +
11. Quick guide
Download from Flash Cards
- switch on Giga 3+ press ON/OFF button
enter flash card into GIGA 3+ - start fast copy press Copy button
- transfer successful? Display shows OK
- loss of data? Display shows NG (no good) if NG is shown save flash memory before reformatting the flash card!
Datamamagenement (Picture or MP3 files)
- switch on Giga 3+ ON/OFF button
- choose FILE menu
- choose data source ESC button ▲▼ → ←
- choose file or folder
Manage Data Source
- switch on Giga 3+ ON/OFF button
- choose FILE menu
- choose data source ESC button ▲▼→ Copy
- choose operation
- ENTER
MP3 Function
- switch on Giga 3+ ON/OFF button
- choose FILE menu
- choose data source ESC button ▲▼ → ←
- select MP3 file
- change settings EQ button
Volume control -V or ^+V
Radio Function
- switch on Giga 3+ ON/OFF button
- select RADIO menu
- turn on Radio
- choose station/channel
- Volume control -V or +V
- search for channel Copy button
Recording Function
- switch on Giga 3+ ON/OFF button
- selectRECmenu
- startREC
- change settings EQ button
- Microphone/line in connect
- start recording
- DISK SELECT
→ HD DRIVER
MS Card
CF Card
12. Connecting to the Computer
Important Notice!
Before use of Giga 3+ please test connection to computer first.
- Never connect the Giga 3+ via a USB HUB. Always use a direct USB connection to Computer to avoid misfunctions.
12.1 WIN XP-SP1 / ME / 2000-SP3
Giga 3+ will install itself on the PC (plug & play).
close and save all running programs first
- establish USB connection between Giga 3+ and PC with USB cable and Switch on Giga 3+ via ON/OFF button.
- WIN XP will install drivers automatically for Giga 3+ .
12.2 Managing Giga 3+ from PC
- Open My Computer.
- 4 different disk drives will be displayed on the desktop.
- The first disk drive symbolises the external hard drive of Giga 3+ .
- The other disk drives with successive letters are the flash card slots of GIGA 3+ , from which you can read/write directly on/from the flash cards like a reader/writer.
Important notice
Never disconnect USB connection between GIGA 3+ and computer while not having selected the disconnection function on the computer. Disconnecting while processing can cause failure of data.
12.3 WIN 98-SE
Please install drivers as described in the following steps.
- Please insert driver CD into the drive of computer and select folder „WIN“.
- Select „setup.exe" in the next folder.
Press „enter“ to continue. - Confirm next step with „OK“ – drivers are completely installed.
-
Shut down computer and reboot..
-
MAC OS X
13.1 Mac 10.1. and higher
Important Notice!
Never copy files back on GIGA 3+ which have names with special symbols or more than 128 letters. THIS MIGHT CAUSE LOSS OF DATA.
- Giga 3+ is compatible with all MAC OS X systems via plug & play.
- Please close and save all current programs on Mac before using device.
- Connect Giga 3+ with AC power adapter (do not switch on Giga 3+ ).
- Connect Giga 3+ with MAC via USB cable.
- Switch on Giga 3+ using the ON/OFF button.
After a short while desktop will show Giga 3+ as „UNTITLELED“. - After selecting folder „UNTITLELED“ the connection between devices via USB is established.
Desktop shows disk drives only when flash card is inserted.
Devices are being disconnected by moving „UNTITLELED“ folder to the recycle bin.
13.2 MAC (9.0 - 9.6) - special driver required per download from www.jobo.com
Important notice
Never copy files back to GIGA 3+ which have names with special symbols or more than 128 letters. THIS MIGHT CAUSE LOSS OF DATA.
Download driver from www.jobo.com to your PC.
- Open the downloaded folder „MAC“ on your PC.
Double click ,CHRWF2_200F/IMGSIT.HQX" and save on HD.
Desktop shows symbol ,CHRW05F62- 2.0“ - please select.
- You will find further instructions in the „READ ME“ file.
- For driver installation select „INSTALLER“ and follow the instructions.
- After installation the system has to be rebooted.
- Connect Giga 3+ and AC adapter and put adapter in the power socket.
- Connect Giga 3+ and Mac via USB cable.
- Switch on Giga 3+.
Devices are being disconnected by moving „UNTITLELED“ folder to the recycle bin.
14. Download Data from Flash Card (without PC)
Insert flash card in the right card slot. See picture in description page 7 for details !
- Insert cards carefully as described!
- Insert flash card only while device is switched off.
- When switching on the Giga 3+ the display shows the symbol of inserted flahs card in the left upper corner (CF,SD,MS,SM) and activates FILE management.
- Press Copy button to start data transfer, the symbols will be shown as followed:
Display 1
COPYING (CF->HD)
All disc to HD
Please wait
Disc Initialising
Display 2
COPYING-(CF->HD) (transfer to HDD)
Copied Dir - 0XX (number of folders)
Copied File - 0XX (number of files)
Copying .... XX% (copy in % -per file)
Display 3
COPYING - (OK) (transfer completed)
Copied Dir - 0XX (number of copied folders)
Copied File - 0XX (number of copied files)
Enter -> (SURE) (back to main menu)
- We recommend formatting flash cards in you camera.
- All data will be copied on Giga 3 + 1:1 , so that the device is able to save all kind of data - even RAW formats of all cameras, all Mac and PC files etc.
- Verify: This feature is available after running a firmware upgrade under www.jobo.com. The verify function compares the file size of the copied data with the data from the source to render maximum security.
14.1. Verify / Data transfer failed (no good)
After a complete data transfer the display shows (OK)
- If comparison of the copied data fails to be complete the display will show (NG)
- NEVER FORMAT A FLASH CARD WITHOUT SECURING YOUR DATA FIRST
- Verify function is being started after copying the data by pressing ENTER
VERIFY - (OK)
Copied Dir - 000X
Copied File - 000 X
Enter (SURE)
( confirm checking data function)
(number of files to be checked)
(number of the files checked)
(ENTER to return to the main menu)
- Do not erase data on flash card before it has been saved on Mac/PC first
14.2 Failure of data transfer
- If there was a failure while transferring the date the following will be displayed:
COPYING - (NG)
Copied Dir - 000
Copied File - 000
Enter -> (SURE)
(FAILURE)
(number of the copied folders)
(number of the copied files)
(back to the main menu)
14.3 Interrupt data transfer
-
Press ESC button and transfer will be interrupted.
-
The following meassages will be displayed:
COPYING - (NG)
Copied Dir - 00X
Copied File - 00X
Enter -> (SURE)
(FAILURE)
(number of folder)
(number of files)
(back to main menu)
14.3 Directory of copied files
with every download from flash card the GIGA 3+ creates a folder containing the data from the flash card. Folders are named with numbers starting from 1 to 9999 and the type of flash card as a pre-fix, e.g..
CF and Micro Drive CF0001-CF9999
SD and MMC SD0001 - SD9999
SM SM0001-SM9999
MS MS0001-MS9999
15. HDD full/reformatting Giga 3+
- when hard disk drive is full, please save data completely to another HDD and reformat GIGA 3+ .
15.1 Reformatting hard disk/data source
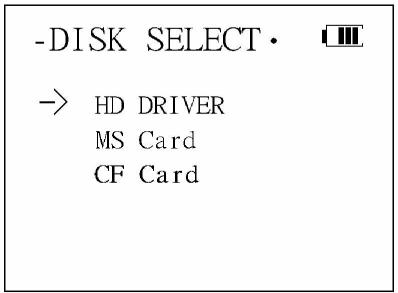
Press ESC button to activate DISC SELECT function
Press button to select data source and confirm while pressing Copy button.
In this menu you can select data source to copy reformat or to execute function FDISC.
COPY
CF Card
ENTER [YES]
Select „Copy“ to copy files or folders from flash card to hard disk.
When „Driver Format" is selected, data source is ready to be reformatted. All files and data will be deleted.
Warning! Save your data to another hard disk drive to avoid loss of data.
When „FDISC" is selected, device is ready to be reformatted. All files and data will be completely deleted
Warning! Save your data to another hard disk drive to avoid loss of data.
16. Managing your data
16.1 Select data source
To display different files select first symbol in the main menu (HDD or flash card).
- DISK SELECT
HD DRIVER
MS Card
CF Card
Press ESC button and select data source using button press to enter.


MEMSTICK . IND
SYSETUP . TCC
ONLY LOVE. MP3
FLYAWAY . MP3
AUDIO <0>
PIC < 0>
Press to display file names.
Display now shows folder on Memory Stick.
On MS card are 2 files and 2 folder. The first two files
show system files from MS card..


MSC001.JPG
MSC002.JPG
MSC003.JPG
MSC004.JPG
MSC005.JPG
Select „PIC“ folder to see file names of 5.JPG files.
16.2 Data Management
COPY
DSC001.JPG
YES PLAY
Press Copy button to select manage mode for data. You can choose from different ways of working with and changing of the data and files on the Giga3+ as follows:
Warning! During copy function, please do not take out the flash card. If you take out the flash card while copying the data could be damaged or lost.

Copy
Selected file or folder can be transferred from/to flash card or hard disk as follows:
-
Select data source/folder/file using ESC ← ▲▼ ←
-
Press button to select and to enter
- Press Copy button, select function (Copy) with button, confirm pressing
- Press ESC button several times and select source with button, press to confirm.
- Use several times and button to select target folder.
- Press Copy button and choose , select PASTE using .
- Pasted contents will be saved to your target folder.
Paste
Copied (Copy) or Cut (CUT) file can be transferred via PASTE function onto the target data source.
Copy/PASTE function can transfer data to and from data source.
Select files and press buttons as described under Copy.
Delete
Selected file or folder will be deleted.
File and folder could be selected as described and then be deleted using DELETE.
CUT
Folder and files can be CUT like in MS-Windows.
Select file and folder like described in the Copy chapter and confirm using CUT.
After that select target folder as described under Copy and use PASTE function to transfer the data.
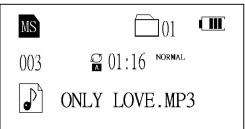
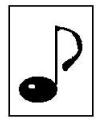
17. MP3 Player
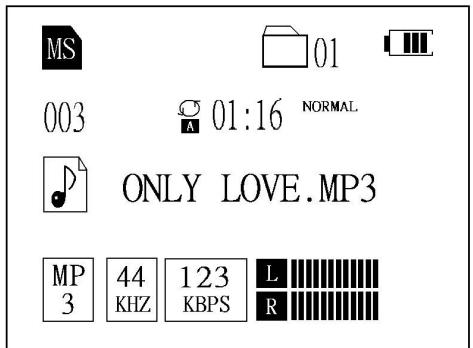
Select FILE function from the main menu (data management) and confirm with .
Select data source on which the MP3 file is saved.
Choose button to select MP3 file and press to enter.
MP3 Player starts automatically and shows the following symbols.
Volume control with -V and +V .
Plug in head- or earphones in the socket.
003.
Track Title

Repeat
NORMAL
EQ Mode (see settings submenu)

Title-Name

Audio Frequency

Sound Quality

left channel

right channel
17.1 Settings in the sub menu


HOLD
NON LOCK
Use EQ button to reach the sub menu of the settings where you can find the following:
Lock/Unlock: - on/off
By pressing -V or +V device can be locked or unlocked. Save status pressing

Sound
NORMAL / USER / POP / CLASSIC / JAZZ / ROCK
Lyric
LYRIC: Lyric display options:
LYRIC: Show lyrics
Non LYRIC: Hide lyrics
Lyric Language
ENGLISH / KOREAN / NO_NLS / SAYEFONT /
CHINESE_TRAD / CHINESE_SIMP / JAPANESE
Repeat
Once Dir: play folder once
Once File: play file once
Repeat Dir. repeat folder endlessly
Repeat File: repeat file endlessly
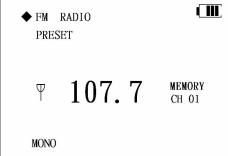
18. FM Radio
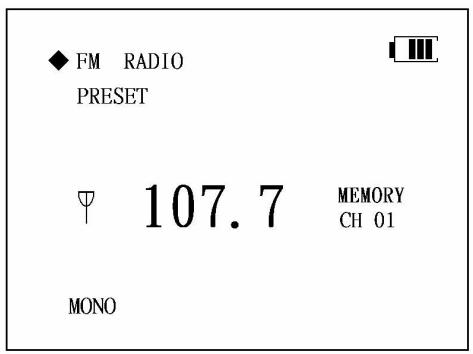
Use button to select RADIO function in the main menu; press to enter.
Use button to select channel or station.
Keep button pressed for automatical channel search.
Volume control via -V and +V
Programming channels automatically
Press to enter PRESET Mode.
Press Copy button to start channel search and programming mode (max. 20 channels) stop using .
In the PRESET Mode channels are selected using .
Mode ( MONO / STEREO ) and number of the selected channel is displayed.
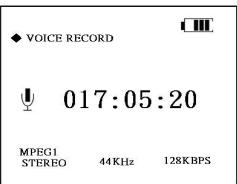
19. Recording function
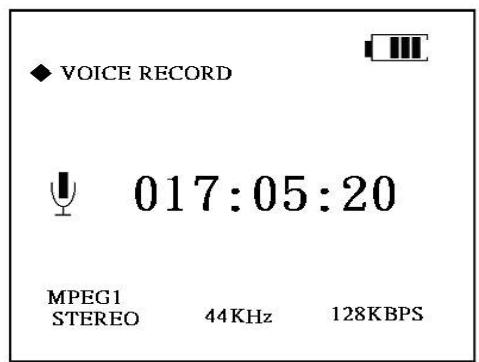
Press button to select recording function in the main menu and use to enter.
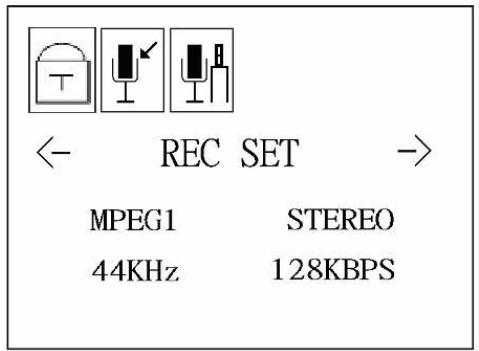
Press EQ button to enter the sub menu. You will find settings as follows:
Lock/Unlock: on/off
Press -V or +V to lock/unlock device and save status by pressing
REC SET: recording quality
Select function using button and select with -V und +V , save using .
32KHz 112KBPS
44KHz 128KBPS
44KHz 160KBPS
44KHz 192KBPS
REC SET: Recording
Select function using button and choose -V und +V to change, save using .
MIC IN: Recording via microphone.
LINE IN: Recording from other data source.
To connect with other sources or microphone use socket on the left side of the device.
20. Optional power source
20.1 Operation with external battery
It is also possible to use an external battery to operate the GIGA 3+ . It is connected to the device via the power socket and can be charged via GIGA 3+ AC power adapter.
With one charge of the external battery about 5 GB can be down- or uploaded.
Jobo Part #: GXB001
20.2 Use with car adapter
It is also possible to use external car adapter to charge or operate the GIGA 3+ .
Jobo Part Nr. GXZ003
21. Troubleshooting
| Questions | Answers |
| Function under DOS, WIN95, WIN98? | These systems are not supported, only WIN98SE and higher. |
| Function under Linux? | Function just with Linux kernel Version 2.4.0 and higher. |
| Which data formats can be downloaded on HDD? | All data and formats can be downloaded on HDD. |
| Device can not be switched on. | 1. No battery inserted. 2. Battery has no / not enough power. |
| Buttons do not work. | System failure - Press RESET button (see back of device) |
| No hard drives are shown when connected to PC/Mac. | 1. Check whether all drivers needed are installed properly. 2. Refresh display using F5. |
| Download failure. | 1. Please check if file is damaged. 2. Please check space left on the HDD; if there is not enough space on Giga 3+; please delete or reorganise your data. 3. Max. number of folders (9999) has been exceeded, please delete old data or reorganise data. 4. Check, if flash card as been inserted correctly. |
| MP3 function does not work. | 1. Please check file format (MP3 ?). 2. Please check, if ear- or headphones have been plugged in properly. 3. Please check, if data or files are damaged. |
22. remarks
Verify: This feature is available as a free down-load under www.jobo.com from Jan. 2005. The verify function compares the file size of the copied data with the data from the source to render maximum security. We recommend downloading this enhanced firmware.
23. Service / technical support
In case of questions please contact the technical support of our distributors or send your requests to support@jobo.com.
Subject to technical modification.
BA Art. Nr.: 86547
JOBO AG - D - 51645 Gummersbach - Köln Str. 58 - info@jobo.com - www.jobodigital.de